Showing posts with label dinner. Show all posts

Wednesday, March 20, 2024

 Day one of Dr. Furman's Transformation 20

Breakfast

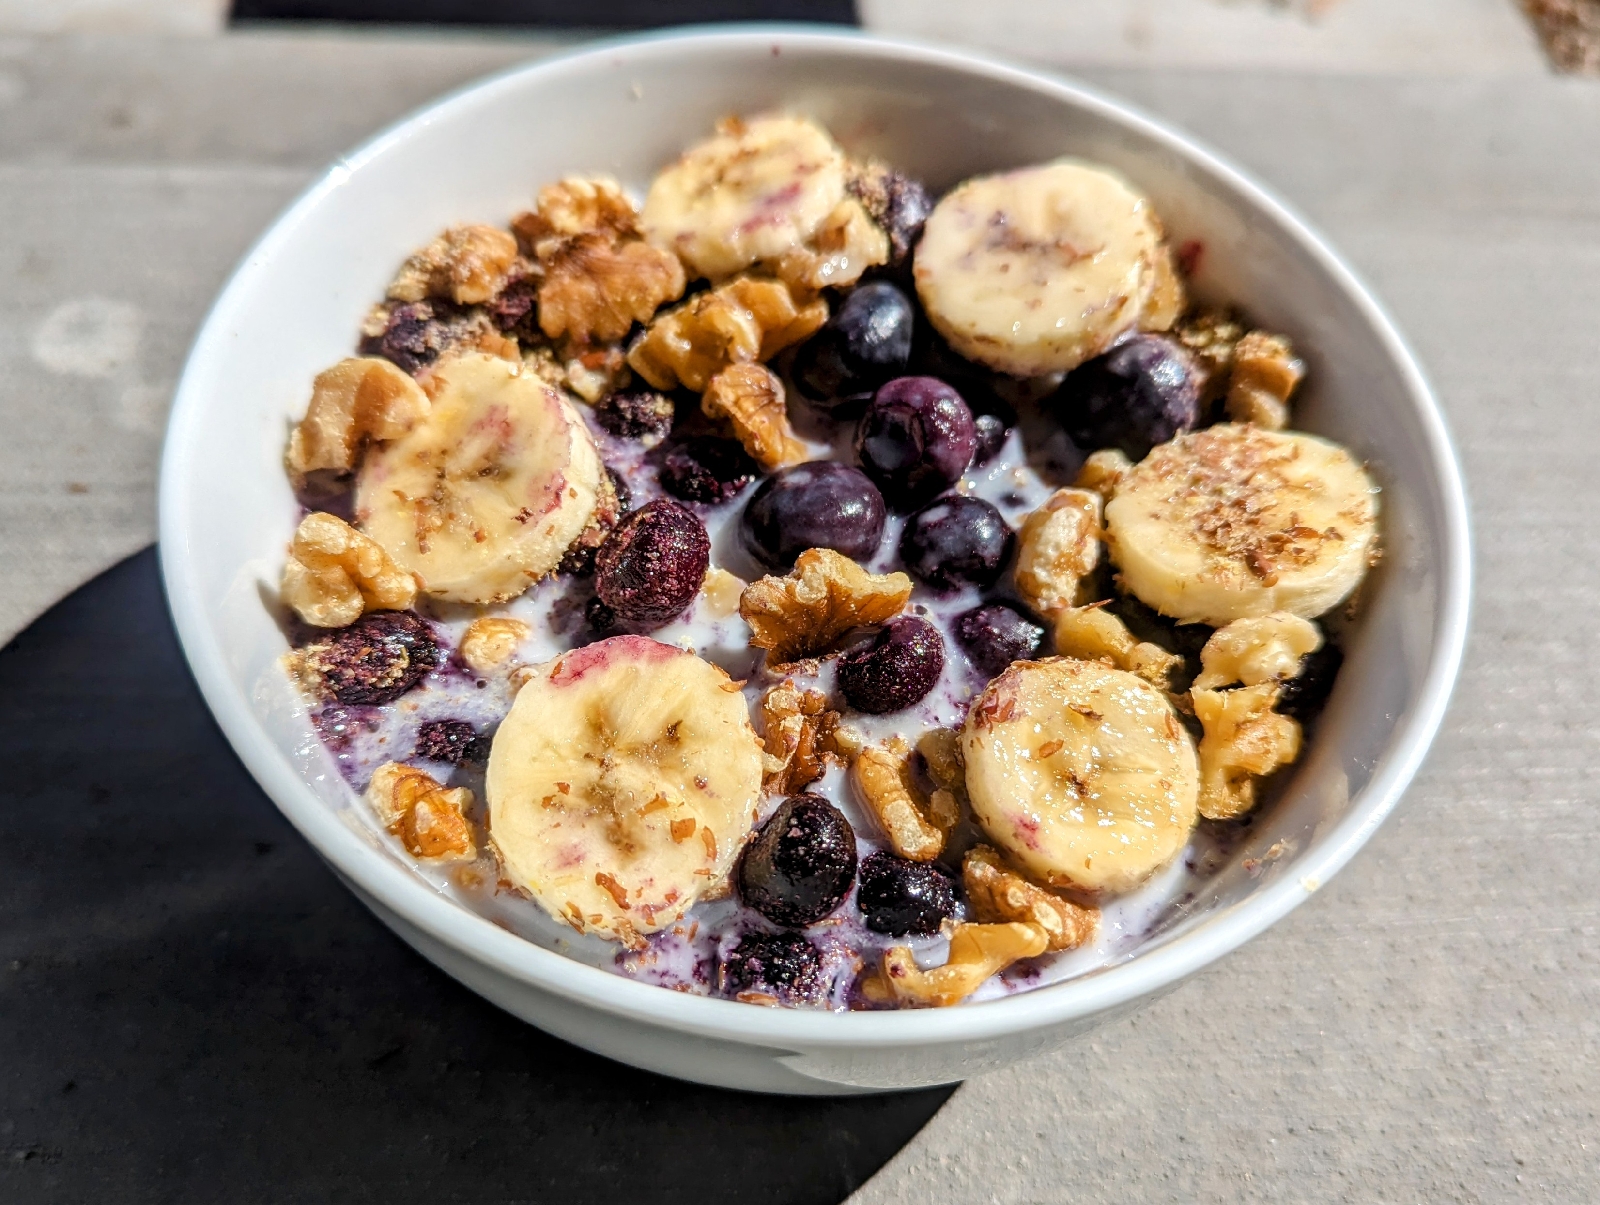
Banana Walnut Breakfast

1serving

1 banana
1 tablespoon ground flaxseed
1 cup blueberries
1/4 cup walnut pieces
3/4 cup unsweetened almond milk

Slice banana into a cereal bowl. Stir in flax seeds, blueberries, walnut pieces, and non-dairy milk.

Thoughts:

This was good! The frozen blueberries made the almond milk turn a beautiful color of purple. It was tasty and filling.

5/5

Dinner

Creamy zucchini and corn soup

3 servings

1 large onion, chopped
3 cloves garlic,
2 lb zucchini (about five medium), chopped
1 teaspoon dried basil
1/2 teaspoon dried thyme
1/2 teaspoon dried oregano
4 cups no salt added vegetable broth
1/4 cup raw cashews
2 tablespoons unhulled hemp seeds
4 cups spinach
2 cups frozen corn kernels
1/4 tsp. Black pepper or to taste

Add onion, garlic, zucchini, basil, time, oregano and vegetable broth to a large soup pot. Bring to a boil, reduce heat, and simmer for 25 minutes or until zucchini is tender.

Pour into a high powered blender (in batches, if necessary), add the cashews and hemp seeds and blend until smooth and creamy.

Return soup to the pot, add corn and spinach, bring to a simmer and cook until spinach is wilted. Add water if needed to adjust consistency. Season with black pepper.

Thoughts:

I made this wrong. First, I sauteed the onion and garlic with about a Tbsp of avocado oil. I used fresh basil. I misread the recipe, and blended about half of the zucchini mixture with the cashews... Oh, and I used homemade chicken stock I had on hand. Also forgot the hemp seeds!

It was alright. Not the worst Dr fuhrman soup I've had. My alterations probably improved it a bit :)

3.75/5

0

Wednesday, May 17, 2017

Antioxidant-Rich Breakfast Bars Close Up

Antioxidant-Rich Breakfast Bars

Breakfast: Antioxidant-Rich Breakfast Bars

6 servings

1 medium ripe banana
1 cup old fashioned oats
1 cup frozen blueberries, thawed
¼ cup raisins
1∕8 cup pomegranate juice
2 tablespoons finely chopped dates
2 tablespoons chopped walnuts
2 tablespoons ground flax seed

Mash banana in a large bowl. Add remaining ingredients and mix thoroughly. Spread mixture into an 8-inch square baking pan that has been lightly wiped with olive oil. Bake for 25 minutes at 350 degrees F. Cool on wire rack and cut into bars.

Refrigerate or freeze leftover bars and use them as an alternate breakfast. Limit -1 per day

Score: 8/10

Okay, so I actually just had some fruit for breakfast, but I tried the breakfast bars when I was visiting my mom. Since they are technically on day 12 I put the picture and recipe up. These bars were alright. They didn't stay together in a bar shape even after letting them cool for a while. The flavor, however was good. The serving size is also very small. Not a super filling breakfast. Definitely felt the need to supplement with some extra fruit. We also had them after coming home from the gym, so we were extra hungry :)

Mexican Salad (this time with the Avocado)

Lunch: Mexican Salad

Repeat from Day 1 (click here to see day 1 with recipe)

I really like this salad. Something about the salsa as a dressing just makes it. I actually had a ripe avocado this time (last time I had to use nuts instead). The avocado added some creaminess. Very good.

Score: 9.5/10


Easy Vegetable Pizza Margherita Style

First, I would like to apologize for the picture. It turned out blurry, so I tried to sharpen it up a bit and it looks terrible! Just know that the actual pizza was very pretty and very tasty.

Dinner: Easy Vegetable Pizza 

Repeat from Day 1 (click here to see day 1 with recipe). I also made this pizza on Day 6 instead of a salad. That time I added leftover artichoke hearts (click here for a link to that). This time I made it using a whole wheat pita a jar of marinara sauce from the pantry, sliced beefsteak tomato, fresh mozzarella, red onion and fresh basil.   

Ingredients all laid out, ready to go on pizza

Pizza before it went in the oven
0

Sunday, May 7, 2017

Mom's Okonomiyaki (Osaka Style)

My daughter Avery and I are up visiting my parents for a bit. The plan was to continue Dr. Fuhrman's 10 in 20. However, best laid plans, and all that...

So, we made okonomiyaki for dinner. It was yummy. There are several ways to make these Japanese cabbage pancakes. In fact, I believe okonomiyaki means "how you like it". Talk about adaptable. We talked about trying them two ways, chopped (Kansai or Osaka style) and layered (Hiroshima style). This didn't happen. My mom usually makes them with a whole bunch of veggies chopped up in a batter (Osaka style), so that's what we did. I tried to snap a quick picture of them cooking away on the skillet, but failed miserably and got this blurry mess of a picture:


My parents have been to Japan and enjoyed the okonomiyaki there. My little bro lived in Tokyo for a few years (as a missionary) and he loves these as well. I don't think my mom put bacon in these, and I know she didn't use any bacon grease, but that's in the recipe she gave me when I asked for it. Either way they were good.

Okonomiyaki (Japanese pancakes)

Ingredients:
2 cups all-purpose flour
1 1/3 cups dashi or low-sodium chicken stock
4 eggs, beaten
8 cups finely chopped cabbage
8 oz. mushrooms, chopped
1 medium zucchini, grated
8 scallions, sliced, divided (sliced tops saved for garnish)
Kosher salt, to taste
4 slices bacon, fried crisp and crumbled (reserve grease)
Olive oil

Kewpie Mayonnaise
Okonomi sauce
Pickled ginger

Directions:
Combine first set of ingredients.  Heat 1/2 tablespoon olive oil (or reserved bacon grease) in a large non-stick skillet over medium high heat until shimmering. Add some of the batter, gently pushing the batter down with a spatula until flattened. Cook until underside is browned, about 4 minutes, Gently flip the pancake and cook about 5 more minutes, or until the cooked through. Serve immediately with mayonnaise, okonomiyaki sauce, pickled ginger, and scallion greens. Repeat with remaining pancakes.
0

Thursday, April 20, 2017

Romaine Lettuce, Homemade Almond-Cashew Butter, and Sliced Bananas
Breakfast: Banana Cashew Lettuce Wraps

2 tablespoons raw cashew butter
6 Boston lettuce or romaine lettuce leaves
1 banana, thinly sliced

Spread about 1 teaspoon cashew butter on each lettuce leaf. Lay a few banana slices on the butter and roll up like a burrito.

Score: 9/10

I was actually surprised that I enjoyed this breakfast. When I imagined fruit and nut butter with lettuce, it didn't sound appetizing at all! Not bad. I would try these again


Lunch: Leftover Chickpea Curry... Not very exciting. Also, I keep skipping the salads, which is not good. Dr. Fuhrman stresses that you should have at least one big salad a day and that should be the main dish when you do have it. Gotta work on that

Cheesy Kale Soup
Dinner: Cheesy Kale Soup 

4 servings 

½ cup dry yellow split peas 
1 onion, chopped
1 cup mushrooms, sliced 
2 cups carrot juice or low sodium vegetable broth 
1 ½ cups low sodium tomato sauce 
5 cups chopped kale 
1∕3 cup raw cashew butter or 2∕3 cup raw cashews 
2 tablespoons nutritional yeast 

Bring 2 cups of water to a boil, add the split peas and simmer until tender, about 35-40 minutes. Add onion, mushrooms, carrot juice or broth and tomato sauce. Bring to a boil, reduce heat, then add kale. Cover and simmer until tender, about 15 minutes, adding a little water if you want to adjust the consistency. Stir in cashew butter and nutritional yeast. If using whole cashews, place in a blender and blend with ½ cup of the soup liquid, then return to the pot. 

Score: 9.5/10

The texture was slightly grainy. Probably due to my use of cashews instead of cashew butter (or because I didn't blend it long enough). It didn't affect the taste. When I started chopping the veggies for the soup I started thinking about how much I've disliked Dr. Fuhrman's soups in the past. Anticancer soup, anyone? I eventually had to toss all my frozen portions of that soup. Blech. This one was good. The split peas could've been cooked a bit more and the cashews blended better, but that was all on me.


1

Tuesday, April 18, 2017


Breakfast: Apple Pie Oatmeal

¼ cup old fashioned or steel cut oats 
½ cup water 
1 apple, peeled, cored, and diced 
dash cinnamon 
1-2 tablespoons raisins or currants 
2 tablespoons chopped walnuts 

Combine oats and water in a small pot, bring to a boil, then  reduce heat and simmer for 5 minutes. Stir in remaining ingredients. 
Note: If using steel cut oats, double the amount of water and simmer for 20 minutes or until tender. 

Score: 9.5/10

Well, since I love to cheat a bit, I used almond milk in place of the water. This was very satisfying. Liked it a lot.

Lunch was supposed to be black bean lettuce bundles, but I missed it. I ate breakfast, dropped Avery off at preschool, and hiked up near the Y in Provo with my exercise buddies. It was beautiful. On the way there I drank a protein shake. By the time I got home with Avery it was 2:45 pm. Our friends came over and stayed until 5 pm. So, I just ate dinner.


Dinner: Creamy Kale and Mushroom Casserole 

4 servings 
½ cup raw cashews or ¼ cup raw cashew butter 
1 cup unsweetened, unflavored soy, hemp or almond milk 
2 cups small fresh or frozen broccoli florets 
1 cup chopped mushrooms 
1 cup frozen artichoke hearts, thawed and chopped (see note)
2 cups chopped kale, tough stems removed 
1 teaspoon no-salt seasoning blend such as Mrs. Dash 
1 teaspoon onion powder 
1 teaspoon garlic powder 
¼ teaspoon red pepper flakes 

Preheat oven to 350 degrees. Blend the cashews and non-dairy milk until creamy. Add to a 9x13 inch oven-proof baking dish along with broccoli, mushrooms, artichokes, kale, and seasonings. Bake for 40 minutes. 
Note: Frozen Brussels sprouts may be substituted for the  artichoke hearts

Score: 9/10

This was better than I thought it would be. The cashew cream stuff added a lot to the casserole. A sprinkle of nutritional yeast might be good on this. The only complaint I had was the serving size. As you can see in the photo above, there's not a ton in my bowl. This is probably due to the cashew and almond milk mixture. I should've had a salad in addition. Instead, I just ate some strawberries and called it a night.

Casserole before it went into the oven


0

Friday, April 14, 2017

Chia Seed Breakfast Pudding( after sitting 15 minutes for the chia seeds to congeal the almond milk)


 Breakfast: Chia Seed Breakfast Pudding

½ cup unsweetened, unflavored or vanilla soy, hemp or  almond milk
2 tablespoons whole chia seeds
2 tablespoons uncooked old fashioned or steel cut oats
½ banana, sliced
½ cup fresh blueberries or frozen, thawed

In a bowl, mix together non-dairy milk, chia seeds and oats. Let mixture sit for 10 minutes or for an on-the-run breakfast, make the night before and refrigerate. Stir in banana and blueberries.

This was good. I've really liked all the breakfasts so far on the 10 in 20 program. It reminded me of the chia pudding mom and I made about 5 years ago... wow, has it been that long?

Score: 8/10

Hummus Wrap with Avocado
Luch: Hummus Wrap (repeat from yesterday, should've been a portobello salad with walnut vinaigrette)

I was short on time, so I just repeated yesterdays lunch and added some avocado. The avocado made this even better. The creaminess seemed to cut the onions. I didn't add the vinegar, but didn't really miss it.

Chickpea Curry in a Hurry
Dinner: Chickpea Curry in a Hurry

2 servings

1 ½ cups cooked chickpeas or 1 (15 ounce) can low sodium chickpeas, drained
½ cup low-sodium vegetable broth
1 ½ cups diced tomatoes
1 teaspoon garlic powder
2 teaspoons curry powder
1∕3 cup unsweetened dried coconut
1 10-ounce box or bag frozen chopped spinach*

Combine all ingredients except spinach in a large saucepan. Cook for 5 minutes, then add spinach. Cover and continue cooking until spinach is thawed and curry is warm, about 5 more minutes.

Score: 8.5/10

*Instead of frozen spinach, I used fresh. A 10 oz package of frozen spinach is about 1 1/2 cups. After cooking down fresh spinach with a bit of water, that's how much you should be left with.  (many places online say to saute spinach with a tablespoon of oil, but I used a few tablespoons of water and it worked out fine. So, 1 lb fresh spinach = 1.5 cups cooked and drained = 10 ounce frozen package.

Right before we started the 10 in 20 program I made a vegan Indian chickpea dish called Chana Masala. The flavor was awesome. The naan might have also helped with how much I enjoyed it ;) This was a bit different. The sweet coconut (I did't have unsweetened in my pantry, so the stuff i used had too much sweet flavor) was okay, but I found it a bit distracting. The texture may have been the culprit there, really. The smell and flavor of this dish was pretty good.
1

Tuesday, April 11, 2017

Soaked Oats and Peaches (Overnight Oats)

Breakfast: Soaked Oats and Blueberries (or peaches?)

½ cup uncooked old fashioned or steel cut oats
½ cup unsweetened, unflavored or vanilla soy, hemp or  almond milk
½ cup blueberries
1 small apple, chopped
½ tablespoon ground flax seeds

Combine oats and non-dairy milk. Soak for at least 30 minutes or overnight. Mix in remaining ingredients.

I didn't go shopping last night, so I  used peaches in my overnight oats instead of blueberries. I happened to have a ton of peaches from our peach tree in our freezer. They added a much needed sweetness to the oats. 

After eating breakfast I looked at the Day 1 recipes and realized I forgot the apple, so I just ate it afterward.

When I've had overnight oats in the past, I've added a pinch of salt, cinnamon or vanilla, and honey to them. Along with frozen fruit I usually have a banana, nuts and chia seeds. This 10 in 20 recipe wasn't bad. I just missed the stuff I usually put in. Especially the salt and honey!

Score: 9/10
Soaked oats (overnight Oats) with peaches instead of berries

Mexican Salad before I mixed it up
Lunch: Mexican Salad

1 head romaine lettuce, chopped
½ cup cooked black beans
1∕3 cup frozen, thawed corn kernels
¼ cup low sodium salsa
½ avocado, peeled and chopped

Toss lettuce with beans, corn and salsa. Top your salad with the chopped avocado.

 So, this was a very simple salad. I didn't have an avocado, so I used some chopped almonds.

I was surprised how much I enjoyed salsa as a salad dressing! So, after getting this salad ready, I didn't have time to eat it before I had to rush my child to preschool and make it to the gym to meet my workout partners. I'm not sure if having a 6 hour gap between breakfast and lunch made it taste better or not (9:30 am to 3:30 pm). Surprisingly I wasn't very hungry until about 30 minutes before I had my salad. I also ate a clementine and a few strawberries. Needed to get the berry portion of my GBOMBS in :)

Score: 9/10
Salsa did a decent job coating lettuce and acting as a dressing


Dinner: Easy Vegetable Pizza

1 large (100% whole grain) tortilla or pita
½ cup low sodium pasta sauce
¼ cup chopped mushrooms
¼ cup chopped red onion
1 cup frozen broccoli, thawed and chopped
1 tablespoon shredded non-dairy mozzarella-type cheese, optional

Preheat oven to 200 degrees F. Place tortilla on a baking sheet and warm for 10 minutes. Remove from oven and top with remaining ingredients. Bake for 30 minutes.

After watching a vlog about day 1 of this plan by Cheri over at the watering mouth (video link here) I expected not to like this pizza. So, confession time - I was a cheater cheater, pumpkin eater. Instead of buying vegan cheese, which is usually just oils and chemicals (who needs artificial chemical flavor in any of their food), I opted for regular dairy. I know! Not even CLOSE to being on plan. Now If I'd had the time I'd break out the nut milk and agar powder to make my own. As a side note, Kite Hill's vegan ricotta and Parma's vegan Parmesan actually look pretty good if I ever need to buy vegan cheese.

Okay, the whole wheat pitta was pretty much cardboard when compared to regular pizza crust, but overall I liked it. Okay, My tomato sauce wasn't no or low-sodium or oil free, and having real mozzarella really upped the flavor too. Also, I didn't have dinner until 9 pm, so I was pretty hungry.

Score: 8.5 (if this were really Dr. Fuhrman approved, I probably wouldn't have liked it so much)

Yes, I used dairy cheese and the Organic Kirkland tomato sauce I had on hand

My pizza topping station! 

 I decided to have the broccoli on the side, steamed with some Ms. Dash 

1

Saturday, April 8, 2017


Chana Masala - chickpea dish cooked in a spicy tomato gravy served with grilled zucchini, fresh campari tomatoes and naan 


Friday night, feeling lazy and uninspired. I look in the fridge...time to go grocery shopping. I look in the pantry and see a can of chickpeas that's been sitting there for months. I really should make something with that. Cue the internet search! I'd actually come across this recipe while searching for reviews on the best family camping tents and falling down the rabbit hole of related post clicking. After retracing those clicks I was able to find this recipe for Chana Masala here.

Since my spice drawer didn't produce any asafetida (Hing) and I didn't really know what it was or how to find an appropriate substitute, I googled it and found out that it adds a garlic and onion flavor. I just added some onion powder and garlic powder for that. Ground cumin was what I used in place of cumin seeds. And since I also don't keep besan (gram flour) on hand, I used the regular white flour that is in my pantry. Also, I wasn't sure if it mattered if the green chilies were fresh or not. I happened to have a can of chopped green chilies in the pantry. Boom. Problem solved. Remember what I said about feeling lazy?

The original recipe is probably far superior, but even with all my substitutions this came out great! My husband was a bit skeptical at first. When he walked in the kitchen he said "What smells like sweat?" Don't worry, that smell quickly turned into something delicious and non-sweat like.

 Chana Masala

Serves 2 to 4. Recipe adapted from ManjulaIngredients

1 15 oz can of chickpeas (Garbanzo beans)
3 tablespoons oil
1/2 - 1 teaspoon onion powder
1/2 - 1 teaspoon garlic powder
1 teaspoon cumin (or cumin seeds if you have them)
1 tablespoon flour
1 large tomato chopped
1 teaspoon ginger paste
1 teaspoon chopped green chilies
2 teaspoons coriander powder
1/2 teaspoon turmeric
1/2 teaspoon red chili powder
1 teaspoon salt
1/4 teaspoon garam masala
1 teaspoon chopped cilantro (I used freeze dried just for color since I didn't have fresh on hand)
Thinly sliced tomatoes for garnish

  1. Drain chickpeas and wash well.
  2. Blend the tomatoes, green chilies and ginger to make a puree.
  3. Heat the oil in a saucepan. (If you are using cumin seeds: Test the heat by adding one cumin seed to the oil ; if seed cracks right away, oil is ready.) Add the onion and garlic powder (or a pinch of asafetida) and cumin. When fragrant (quickly so spices don't burn) add the flour and stir-fry for a minute.
  4. Add the tomato puree, coriander powder, turmeric, and red chili powder. Cook about four minutes on medium heat. The tomato mixture will separate from the oil and reduce to about half in quantity.
  5. Add chickpeas, salt, and one cup of water. Cook, covered, for seven to eight minutes on medium heat.
  6. Press a few of the chickpeas with a spatula to soften. Add more water as needed to keep the gravy consistency to your liking, and let it cook on low heat a few more minutes.
  7. Add the garam masala and cilantro. Let it cook for another minute.
  8. Garnish with thin tomato slices.
Serving Suggestions:

Chana Masala goes well with any Indian flat bread or over plain rice.


I blended up the tomato, chilies, and ginger in our little magic bullet because I was too lazy to take out the vitamix!      


0

Wednesday, September 21, 2016

Garlic and Basil Chicken with Marinara Sauce over Zucchini Noodles 

Last night I looked at my macros and noticed I needed more protein to hit my goals, but not very many carbs. Looking in the fridge I noticed a lone zucchini and some marinara sauce... Why not make zucchini noodles! So, out came the spiralizer and voila! Dinner was made right quick like.

Brieftons NextGen Spiralizer, photo courtesy of Amazon 

Now, the spiralizer that I have is by Brieftons and is called their NextGen Spiralizer. Is it great? No. Did I get it on the cheap? Yes. I know there's no substitute for a crank-turned spiralizer, but until I start really getting into spiral cut veggies and want to dedicate more money and kitchen space to it, this will do.

Chef Shamy Garlic Butter,with Parmesan and basil
Snagged pics from here

Overall the dish was good, but not amazing. It definitely looked pretty. I really wasn't all that hungry and I think I over salted the noodles, so I might try this again and see how I feel about it. I cooked the chicken up with Chef Shamy's delicious garlic butter. Gotta Love Costco! The marinara sauce is just jarred. I used the Silver Palate San Marzano Blend Tomato Basil Pasta Sauce because it's what I have on hand. I decided to try baking my noodles. Next time I would either leave them raw or zap them in the microwave for about a minute.

Baked Zucchini Noodles

Ingredients:
1 or more medium zucchini
Salt

Step 1: Preheat oven to 200 degrees Fahrenheit. Line a baking sheet with a double layer of paper towels.
Step 2: Spiralize your zucchini and evenly distribute the resulting noodles on the baking sheet.
Step 3: Sprinkle the noodles with sea salt. The salt helps to draw out the moisture while the paper towel will soak it up. Cook for 10-15 minutes
Step 4: Remove from the oven and gently squeeze the noodles with a fresh paper towel to wring out any additional liquid.


1

Monday, September 19, 2016

Peanut Curry Chicken with Cauliflower Rice
Tonight I wanted something quick, flavorful, and heavy on the protein in order to hit my macros. I saw a video on you tube where a guy made a simple peanut curry chicken using curry powder and peanut butter. I though it would be good with rice, but I'd eaten most of my allotted carbs for the day.

Enter cauliflower rice. I've seen this around the internet and never actually thought about making it. After reading several reviews of the best way to cook cauliflower rice (like the one here from Epicurious, the one here from One Good Thing, or the one here from BBC's Good Food, or here), and  many other blogs (like here at the Minimalist Baker, here at Damn Delicious, or this curried cauliflower rice from Martha Stewart or here) and watching videos (like this one, or this one) I wasn't sure If I wanted to roast it in the oven or cook it in a pan on the stove top.

I decided to roast the cauliflower in the oven. It still had a bit of that funky cauliflower smell when cooking, but it was tasty. I made two batches, because I had a very large head of cauliflower, but I left one of the pans in too long and it started to burn. The "rice" still tasted good. I sprinkled the  cauliflower rice with garlic powder during cooking and sprinkled some parsley on for color after it was done. Did it taste like rice? Nope. It tasted like roasted cauliflower. Definitely made a good rice substitute, though. I've seen people add their "rice" to a wok straight from the freezer in order to make fried rice, so I might try that with the rice that I froze.

Peanut Curry Chicken
Recipe adapted from The Diet Kitchen (link is to a video)

1 Tbs Coconut oil
2 Chicken breast, cubed
Curry Powder, to taste
Salt and black pepper, to taste
1/2 - 1 Tbs peanut butter

Step 1: In a medium frying pan, heat coconut oil over medium high heat until liquefied. Add chicken to pan.

Step 2: When chicken has just started to cook (turning white), add curry powder until covering the chicken pieces, pepper, and salt. Stir until seasoning evenly coats all pieces of chicken. Let it cook 1-2 minutes.

Step 2: Add peanut butter. Mix in with chicken as it starts to melt. At this point, you can add a bit of water and stir in order to make a more saucy chicken. Cook chicken for about 5 more minutes.


Roasted Cauliflower Rice

1 Head cauliflower

Step 1:  Preheat oven to 425 degrees Fahrenheit. Line a  rimmed baking sheet with foil and spray with cooking spray. Wash and dry cauliflower. Remove all greens and core. Cut into 4 even sections.

Step 2: If cauliflower is not completely dry, let it sit out for about 5 minutes. At this point the cauliflower can be grated with a hand/box grater, or placed into a food processor and pulsed a few times until it's about size of rice granules. Can place 2 cup portions in freezer baggies and freeze at this point.

Step 3: Place cauliflower onto a dish towel or paper towels and gently press to remove any excess moisture. Spread onto foil lined pan and place in oven. Stir after about 5 minutes. Check at about 8-12 minutes. Rice should start getting a nice golden color, but not burnt.

Step 4: Season as desired


0

Vegetable Tian
Ahhh, the end of the summer produce is upon us. I will miss the flavorful tomatoes from friend's and family's gardens (we have not planted one yet in our new home, but hopefully that will happen sooner rather than later). I will miss the zucchini, summer squash, eggplant, cucumbers, green beans and corn that are local and often grown by people I know. Sure, I will buy them and eat them throughout the rest of the year, but nothing beats a homegrown tomato! Of course, I am getting ahead of myself, there is probably another month or so for some of these vegetables and then of course all the fall and winter produce is great too...it just doesn't seem as plentiful. I do love me some vegetables. My husband doesn't understand what he is missing out on by being so picky.

So, what to do with tomatoes from our neighbors and squash (yellow crookneck/summer and zucchini) from my mother and father-in-law? I decided to make ratatouille's better looking cousin, a tian. Now, this is really just a fancy looking vegetable casserole/gratin type dish. Did you know that in the movie Ratatouille they actually made a tian at the end, not ratatouille? I'd never realized it until now. On a side note, It's been forever since we made ratatouille. In fact, as a trip down memory lane, click here to see my ratatouille and click here to see my mom's (Jane's).

A traditional Provençal tian is made with tomatoes, zucchini, onions, and eggplant, I believe. I did not have an eggplant on hand. I also looked up some recipes online and saw that many people made a riff on this dish with potatoes. I had a potato. My tian is not as pretty as all those pictures online. I used my mandolin to slice the veggies to an even 1/4 inch thickness, but the potato was huge in comparison to my other vegetables. So much so, that I even stacked some slices of squash on top of one another to to be about as high as the potato slices. Also, I had varying sizes of tomatoes. This meant that I had to slice more tomatoes than I thought (3 in total) and they were all inconsistent in diameter. Oh the frustrations of perfectionism!

Those beautiful overlapping rows of artfully arranged and thinly sliced vegetables may have proved elusive, but oven roasting them into a slightly caramelized state proved successful. I used fresh rosemary because I had it, but the rosemary flavor was strong. I used about 1 to 1 and 1/2 tsp chopped fresh rosemary. Next time I might just stick with dried herbs for this, either rosemary and thyme, or just Italian seasoning. A few other notes, I chose to slice my veggies into 1/4" rounds, but the potato took a long time to cook. I checked it afer 45 minutes, then 50, then and hour. I had to recover it with foil since the cheese had already started browning, but it wasn't until around the 65 minute mark that the potatoes were really fork tender. I've enjoyed eating this. Too bad nobody else in the house will touch it.

Vegetable Tian

1 Tbs Olive oil
1 medium yellow or sweet onion
2 cloves garlic
1 medium zucchini
1 medium yellow summer squash
1 medium potato, yukon gold or russet
1-3 medium tomatoes
1 tsp dried thyme
1/2 tsp dried rosemary
salt and pepper, to taste
1/2 - 1 cup shredded Italian cheese blend or a few ounces of Gruyere, grated

Step 1: Preheat the oven to 400ºF. Finely dice the onion and mince the garlic. Sauté onions in a large skillet over medium heat with olive oil until softened and transparent (roughly 5 minutes) then add the garlic until fragrant (about 1-2 minutes).

Step 2: While the onion and garlic are sautéing, thinly slice the rest of the vegetables. Try to slice them into the same shape, a 1/8" or 1/4" thick coin. A mandolin works well, but you could also use a food processor or cut them by hand if you can maintain a consistent thickness.

Step 3: Spray the inside of an 8×8" square or round baking dish with non-stick spray. Spread the softened onion and garlic in the bottom of the dish. Place the thinly sliced vegetables in the baking dish vertically, in an alternating pattern. Sprinkle generously with salt, pepper, thyme, and rosemary.

Step 4: Cover the dish with foil and bake for 30 minutes. Remove the foil, top with cheese and bake (uncovered) for another 15-20 minutes or until the cheese is golden brown.


1

Wednesday, September 14, 2016

Best Chicken Parmesan

I've been craving spaghetti. I thought about making meatballs, but that required going to the store. Bleh. So often leaving the house just sounds exhausting. Wow, I sound so lazy right now! Well, we had everything to make Chicken Parmesan, so that's what we had. As I always do, I looked online to see if I could get any tips or tricks from the good folks over at America's Test Kitchen/Cook's Illustrated/Cook's Country.... They actually had a few different recipes. I decided to use the one with 'best' in the title. It was very good. Not low cal, but who cares when it tastes good. That's what moderation and portion control are for.

As a side note, I called this Chicken Parm when talking to Andrew and he said, "You are not on such familiar terms with this dish that you can start calling it 'Parm'. Please use the full name." So, until I develop Italian-American roots, it's Chicken Parmesan for us.

Baked Parmesan Chicken
I used chicken tenderloins, so the portions were smaller. Andrew had 2 or three and I just had one. Salting the raw chicken and letting it sit for 20 minutes really kept the chicken tender, and the ratio of cheese to panko made a very crispy and flavorful crust. Since, as stated above, I was feeling lazy, I just used jarred pasta sauce (gasp!). The cheese we had on hand was aged white cheddar, so I used that.

Best Chicken Parmesan (from Cook's Illustrated)

Ingredients

1 lb. pasta

Sauce:
2 tablespoons extra-virgin olive oil
2 garlic cloves , minced
Kosher salt and pepper
1/4 teaspoon dried oregano
Pinch red pepper flakes
1(28-ounce) can crushed tomatoes
1/4 teaspoon sugar
2 tablespoons coarsely chopped fresh basil

Chicken:
2 (6- to 8-ounce) boneless, skinless chicken breasts , trimmed, halved horizontally, and pounded 1/2 inch thick
1 teaspoon kosher salt
2 ounces whole-milk mozzarella cheese , shredded (1/2 cup)
2 ounces fontina cheese , shredded (1/2 cup)
1 large egg
1 tablespoon all-purpose flour
1 1/2 ounces Parmesan cheese , grated (3/4 cup)
1/2 cup panko bread crumbs
1/2 teaspoon garlic powder
1/4 teaspoon dried oregano
1/4 teaspoon pepper
1/3 cup vegetable oil
1/4 cup torn fresh basil

Instructions

Bring a large pot of water to a boil for pasta.

FOR THE SAUCE:
1. Heat 1 tablespoon oil in medium saucepan over medium heat until just shimmering. Add garlic, ¾ teaspoon salt, oregano, and pepper flakes; cook, stirring occasionally, until fragrant (I find this happens very, very quickly, about 15 seconds). Stir in tomatoes and sugar; increase heat to high and bring to simmer. Reduce heat to medium-low and simmer until thickened, about 20 minutes. Off heat, stir in basil and remaining 1 tablespoon oil; season with salt and pepper to taste. Cover and keep warm. You will want to reserve 1/2 cup of the sauce to spoon over cutlets in the end; the rest will sauce the pasta.

FOR THE CHICKEN:
2. Sprinkle each side of each cutlet with 1/8 teaspoon salt and let stand at room temperature for 20 minutes. Combine mozzarella and fontina in bowl; set aside.
3. Adjust oven rack 4 inches from broiler element (this is the top rack in my oven) and heat broiler. Whisk egg and flour together in shallow dish or pie plate until smooth. Toss together Parmesan, panko, garlic powder, oregano, and pepper in second shallow dish or pie plate. Pat chicken dry with paper towels. Dredge cutlets, one at a time, in egg mixture, allowing excess to drip off. Coat all sides in Parmesan mixture, pressing gently so crumbs adhere. Transfer cutlet to large plate and repeat with remaining cutlets.
4. Add 2 tablespoons salt to boiling pasta water, cook, and drain pasta.
Heat vegetable oil in 10-inch nonstick skillet over medium-high heat until shimmering. Carefully place 2 cutlets in skillet and cook without moving them until bottoms are crispy and deep golden brown, 1½ to 2 minutes. Using tongs, carefully flip cutlets and cook on second side until deep golden brown, 1½ to 2 minutes. Transfer cutlets to paper towel–lined plate and repeat with remaining cutlets.
Place cutlets on rimmed baking sheet and sprinkle cheese mixture evenly over cutlets, covering as much surface area as possible. Broil until cheese is melted and beginning to brown, 2 to 4 minutes, rotating baking sheet as necessary for even browning. Transfer chicken to serving platter and top each cutlet with 2 tablespoons sauce. Sprinkle with basil and serve immediately with sauced pasta.

0

Tuesday, September 13, 2016

Chicken and Veggie Stir Fry with Teriyaki Sauce
For dinner we made a quick stir fry. I had leftover teriyaki sauce in the fridge from some teriyaki chicken we'd made last week, so I  decided to use that as the sauce. First, I defrosted some frozen chicken tenderloins and cut them into bite sized chunks. I put those in a bowl with some of the teriyaki sauce and a dash of fish sauce; covered it and put it in the fridge right before I went to pick Andrew up from work. By the time we got back, it had marinaded about 20-30 minutes. I took out our wok, put in some coconut oil and when it was shimmering I threw in the chicken. When it was cooked through, I put the chicken in a bowl and threw in a package of frozen stir fry vegetables. As those cooked, I put a bit of reserved teriyaki on them and added the chicken back in at the end. We had leftover rice in the fridge, so dinner was on the table fast!

I remember reading that teriyaki sauce is very simple to remember because it's three "S's" and two "G's": soy, sherry, sugar, garlic, ginger. I don't have sherry on hand, so I used some apple cider that we had in the fridge.

Teriyaki Sauce

1/4 cup low sodium soy sauce
2 Tbs brown sugar
2 Tbs apple juice/white grape juice*
2 Tbs rice vinegar
2 garlic cloves, minced
1 tsp fresh ginger, grated
1/4 tsp red pepper flakes

Place ingredients in a sauce pan over medium to medium high heat. Stir until sugar dissolves, remove from heat and let it sit a few minutes for the flavors to blend.

*This would normally be sherry in a recipe. I know people often use mirin, marsala, sake or dry white wine in place of sherry. Since I don't often cook with alcohol, I've used apple juice, white
grape juice, or in place of 2 Tbs Sherry/Mirin, 2 Tbsp. water + 3/4 tsp. sugar. Maybe pinapple juice would be good...

0

Monday, October 12, 2015


When I went in for my physical last month Dr. Yamaguchi said my blood work looked great, except that my sugar was a little higher than it has been at past appointments. I decided to be pro-active and do something about it. I read Dr. Mark Hyman's book The Blood Sugar Solution and decided to try the recipes at the back of the book and blog my results.

The braised green I used was red chard. I followed all three recipes exactly.

Mark and Andrew helped judge the dishes. They both didn't like the chard. Mark gave it a D. I kind of liked it and would have given it a B-.

Mark gave the Millet Cauliflower Mash a B. That's about what I'd give it. I thought it needed to cook a little longer so the millet was softer. We all agreed it needed more flavor. Andrew said the Cauliflower and Chard dishes tasted better if you mixed them together.

We all liked the Meat Loaf, but agreed that it needed to cook a little longer (15 minutes?) so it set up better. Mark gave it an A-.
Turkey and Spinach Meatloaf, Braised Red Chard, Millet Cauliflower Mash

 (I forgot to take a picture of the meatloaf by itself. In case of any confusion, it's in the above picture on the far left...with a label below it)

Turkey and Spinach Meat Loaf
Serves 4

1 1/2 cups pecans
1 pound lean ground turkey
10-ounce package frozen spinach, thawed and squeezed dry
2 eggs
1 Tbsp extra virgin olive oil
1/2 small onion, diced
1 tsp dried basil
1/4 tsp sea salt
pinch of black pepper

Preheat oven to 375°F. In a food processor, grind the raw pecans to a medium-fine texture. In a large mixing bow., combine the ground pecans with the remaining ingredients. Mix well. Place into an oiled loaf pan and bake for 30 minutes. Remove from the oven and allow to cool 5 minutes before serving. Serve with Millet Cauliflower Mash and Braised Greens with Red Onion and Sun-Dried Tomatoes.

418 calories per serving


Millet Cauliflower Mash
Serves 4

1 Tbsp extra virgin olive oil
1/2 small onion, diced
1/2 cup millet, rinsed
4 cups cauliflower, chopped
1 tsp dried sage (or 1 Tbsp fresh)
1 1/2 cups water
1/4 tsp sea salt
chopped fresh parsley for garnish

In a medium saucepan over medium heat, heat the olive oil and saute the onions until they start to brown. Add the millet, cauliflower, and sage and saute 1 more minute. Add the water and bring to a boil, then add the salt. Cover, reduce heat, and simmer for 20 minutes, until the millet is soft. When done, blend with a potato masher. Sprinkle with the chopped parsley and serve.

122 calories per serving


Braised Greens with Red Onion and Sun-Dried Tomatoes
Serves 4

1/2 red onion, sliced
2 Tbsp sun-dried tomatoes, sliced
4-6 cups thinly sliced greens (any combination of kale, chard, and collard greens works well)
1/2 cup water
1 Tbsp extra virgin olive oil
splash of balsamic vinegar (optional)

Place the onion, tomatoes, and greens in a saute pan with the water. Bring to a boil, then reduce to simmer on low until the greens are soft. Splash with olive oil and balsamic vinegar before serving.

82 calories per serving
0

Wednesday, August 5, 2015

Willow and I have decided to take another go at Dr. Fuhrman's Eat to Live program. Tonight I opted to start with a Kung Pao Tofu recipe I found at this site. It's a recipe I'd never tried, so I told Mark I was going to follow the recipe exactly for once. 


I knew I couldn't do it. 

I ended up using only 1/2 each of the red and yellow peppers. I then added onions and mushrooms. I didn't have the optional hot sesame oil so I added 2 tsp. regular sesame oil with about 1/4 tsp. dried pepper flakes.

The first thing I did was cube the extra-firm tofu, toss it with five spice powder and fry it until browned.

The results after stir-frying the veggies and combining it all together were quite colorful and enticing. We served it over brown rice.  (Mark sprinkled a little soy sauce over his at the table to add a little more salty flavor).
2

Monday, August 3, 2015

Saturday we found black mission figs in our Bountiful Basket. There were 7 figs in a plastic container. Mark and I each tried one. They were soft and ripe and tasty. I quickly hid the final five in the back of the fridge and got on the internet to find a recipe for fig pizza. I've always wanted to try one. Now was my chance.


The recipe I liked best was at this site. I put prosciutto and gorgonzola on my shopping list. Then I realized I had some Tillamook extra-sharp white cheddar cheese in my fridge that needed to be used. I also had a few slices of nice deli ham that needed a place to land. No need to go shopping, I had everything I needed right here at home. The resulting pizza was DELICIOUS! So many layers of flavor. I have some figs in my freezer that I got from Costco a while back. I think next time I'll see if they work on a pizza with the gorgonzola and prosciutto.


Fig, Prosciutto, Gorgonzola and Caramelised Onion Pizza

For the topping
Small handful of uncooked polenta
4 or 5 figs, sliced 
6 thin strips of prosciutto
Approx 200g Gorgonzola - or blue cheese you like
2 large onions, halved and then finely sliced
2 tbs butter
1 tsp olive oil
Approx 2 tbs of fresh, chopped rosemary
Approx 1 tbs honey
Approx 1 tbs balsamic vinegar
Salt and Pepper to taste

  1. Preheat your oven to 220C and prepare your pizza tray (I used a rectangular baking tray) by scattering the polenta over the tray and lightly tapping the bottom to ensure that it is evenly dispersed across the tray.
  2. Prepare your pizza dough according to this recipe or one of your choice.
  3. While the dough is rising, add the butter and oil to a heavy based pan over a low to medium heat. Once the butter has melted, add the rosemary and onion and cook down for about 10-20 minutes, stirring occasionally and scraping the pan down to prevent the onion from catching and burning. Once done, transfer the onions to a bowl lined with paper towel. Set aside.
  4. Assemble the figs, Gorgonzola, prosciutto, honey and balsamic vinegar.
  5. Once your dough has risen, knead according to the recipe and turn out onto a lightly floured surface. Roll your dough into your desired shape and place it carefully on your tray, gather the edges to form the crust.
  6. Top the dough with the onion, spreading it out evenly over the base.
  7. Arrange the figs, Gorgonzola and prosciutto over the onions and drizzle with the honey and balsamic. Season to taste.
  8. Bake in the oven for 15 minutes or until the crusts have turned light brown and crispy.
  9. Carefully take out of the oven and transfer the pizza to a board to slice up and eat.
1

Translate